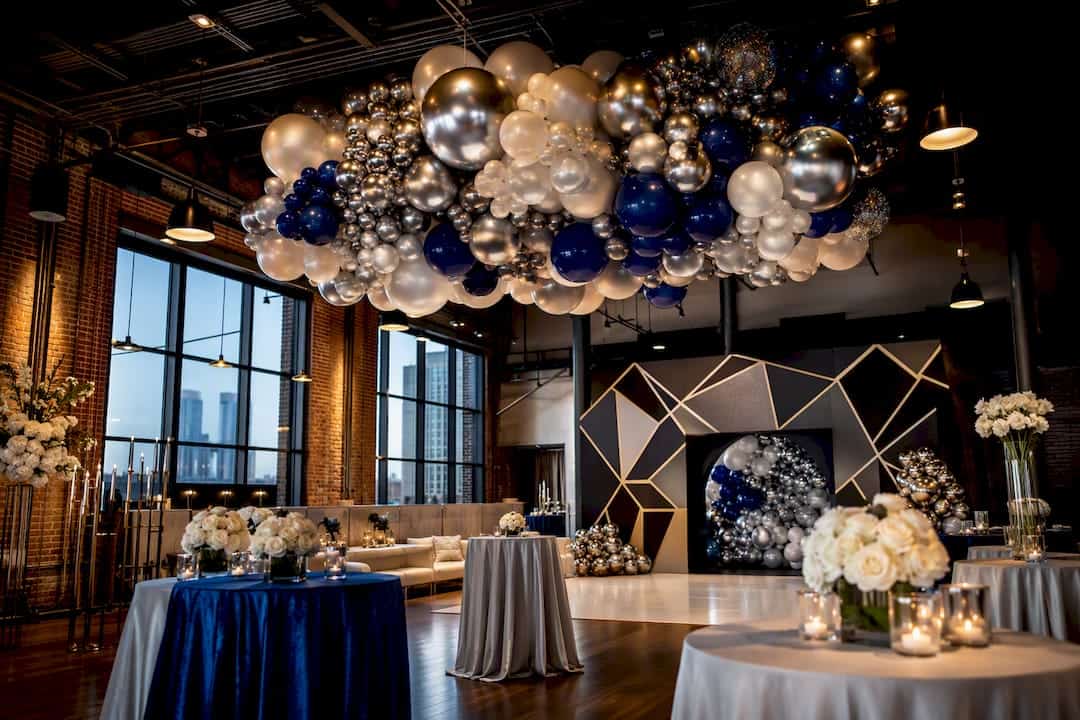
Yes, a balloon chandelier is one of the most dramatic ceiling treatments a luxury event can have, and the right method depends entirely on scale. Small rooms with clearance under 12 feet can succeed with an air-hook installation a DIY decorator handles alone. Anything larger, higher, or rigged over guests needs a certified installer working from a documented rigging plot. This guide walks through materials, attachment methods, step-by-step workflows, safety requirements, and the luxury styling details that separate a pretty cluster from a showstopping centerpiece.
TL;DR:
- Using helium in balloon chandeliers limits float time to 8 to 12 hours unless helium treatments like Hi-Float are applied, making air inflation preferable for multi-hour setups.
- Attaching chandeliers to drop-tile ceilings requires grid clips on metal T-bars, while drywall and plaster walls need carefully cured adhesive hooks, and beams should be bridled for even load distribution.
- Accurate rigging documentation and venue approval are essential, with a documented rigging plot, load limits, and professional sign-offs required before installation begins.
- Large, tiered chandeliers often need multiple crew members, careful planning of drop lines, and can cost between $200 and $500 in kits, plus additional labor fees for complex or rush setups.
- Regular on-site checks during events help maintain appearance and safety, with adjustments for heat, humidity, and shifting balloons to prevent sagging or deflation.
Table of Contents
- What Is a Balloon Chandelier, and Who Needs One?
- Materials and Tools You’ll Need for a Balloon Chandelier
- How Do You Attach a Balloon Chandelier by Ceiling Type?
- Step-by-Step Balloon Chandelier Installation Guide
- Rigging Safety and Venue Approval: What You Actually Need
- Luxury Design Ideas That Elevate a Balloon Chandelier
- Timing, Staffing, and Pricing Factors to Budget For
- How a Professional Balloon Installer Handles the Details
- Tearing Down a Balloon Chandelier Without Damaging the Venue
- Keeping a Balloon Chandelier Looking Sharp All Night
- Fixing Common Balloon Chandelier Problems on Site
- The Planner’s Real Takeaway on Balloon Chandeliers
- Ready to Book Your Luxury Balloon Chandelier
- Rigging and Safety Resources Venues May Request
- Sources
- FAQ
What Is a Balloon Chandelier, and Who Needs One?
A balloon chandelier is a suspended balloon installation designed to mimic the visual weight and drama of a traditional lighting fixture. Instead of a single garland running along a ceiling, the chandelier concept pulls balloons upward into a focal point, often tiered, layered, or cascading downward in staggered lengths that catch light from multiple angles.
This look is popular for galas at ballrooms, product launches in lofts, and rooftop brand activations where the ceiling itself becomes the design canvas. It reads as sculptural rather than decorative, which is exactly why corporate clients and high-end residential hosts keep requesting it over a flat garland.
The format works because it solves a real spatial problem: empty ceiling space above a dance floor or stage often feels unfinished at upscale events, and a chandelier installation fills that void without blocking sightlines the way a low centerpiece might.
Materials and Tools You’ll Need for a Balloon Chandelier
Air-filled balloons hold their shape for days, while helium-filled latex without treatment typically floats for only 8 to 12 hours before noticeable deflation. That single fact should drive most of your material decisions, since air is the safer default for any installation set up more than a few hours before doors open.
Beyond the balloons themselves, a proper chandelier build calls for a specific kit of hardware and consumables:
- Electric or battery-powered inflators for volume work, plus a hand pump for touch-ups
- Balloon tape or fishing line rated for the cluster weight, not household string
- Ceiling clips, drop-tile grid clips, or removable adhesive hooks rated for the surface
- Rigging carabiners and anchor points for larger suspended sections
- Hi-Float or a comparable sealant if any portion of the design uses helium
- Cylinder safety gear, including securing straps, if helium tanks are on site
Luxury installers typically supply the rigging hardware, cylinders, and Hi-Float as part of the service, so DIY decorators should confirm exactly what a vendor includes before assuming a line item is covered.
How Do You Attach a Balloon Chandelier by Ceiling Type?
Attachment method matters more than balloon color when it comes to a clean installation, because the wrong hardware on the wrong surface either fails mid-event or damages a venue you’ll want to book again.
- Drop-tile grid ceilings. Use grid clips that hook directly onto the metal T-bar, never the tile itself. Tiles are not load-bearing and will crack or fall under sustained weight.
- Painted drywall or plaster. Removable adhesive hooks work, but only after a cure test on an inconspicuous patch. Give the adhesive the full manufacturer cure time, often 30 minutes to an hour, before hanging any weight.
- Exposed beams or trusses. This calls for bridling, where the load is distributed across multiple rated points rather than a single hook. Hang at truss nodes, never mid-chord, since mid-chord loading compromises the truss’s rated capacity.
- Tents and fabric canopies. Tie directly to the frame structure. Adhesives on tent fabric almost always fail and can void a rental agreement.
Pro Tip: When a venue’s ceiling finish is unknown or historic, ask about a freestanding frame instead. A self-supporting structure lets you build the full chandelier off-site, logistics without a single hook touching the venue’s ceiling.
Step-by-Step Balloon Chandelier Installation Guide
The right workflow depends on which balloon fill and hardware combination you chose above. Here are the three most common paths.
Air-hook method (small rooms, DIY-friendly):
- Mark the layout on the ceiling with removable tape before hanging anything.
- Let adhesive hooks cure fully.
- Inflate balloons to roughly 90% of full size so clusters don’t strain against fishing line.
- Tie clusters in matched sets, then hang and adjust spacing by eye.
Helium-cluster method (same-day drama, taller rooms):
- Treat balloons with Hi-Float the morning of the event if float time needs to exceed a few hours.
- Chain cylinders securely and keep them upright and strapped during transport and on site.
- Inflate as close to doors-open as your schedule allows.
- Attach to rigged anchor points, not adhesive hooks.
Waterfall or kit method (large, tiered chandeliers):
- Pre-build drop lines off-site in modular sections.
- Distribute anchors across multiple rated points per the rigging plot.
- Measure each drop line against the plan before final hang.
Before opening doors, walk the room for clearance, check lighting angles, and post a spotter near any high-traffic zone under the installation.
Rigging Safety and Venue Approval: What You Actually Need
This is the section that separates a professional installation from a liability. ANSI E1.4-1 and related entertainment rigging standards call for a documented rigging plot with an 8:1 design factor, meaning every rated component carries eight times the load it will actually bear. That margin exists because ceiling installs sway, shift with HVAC airflow, and take incidental bumps from staff during a long event.
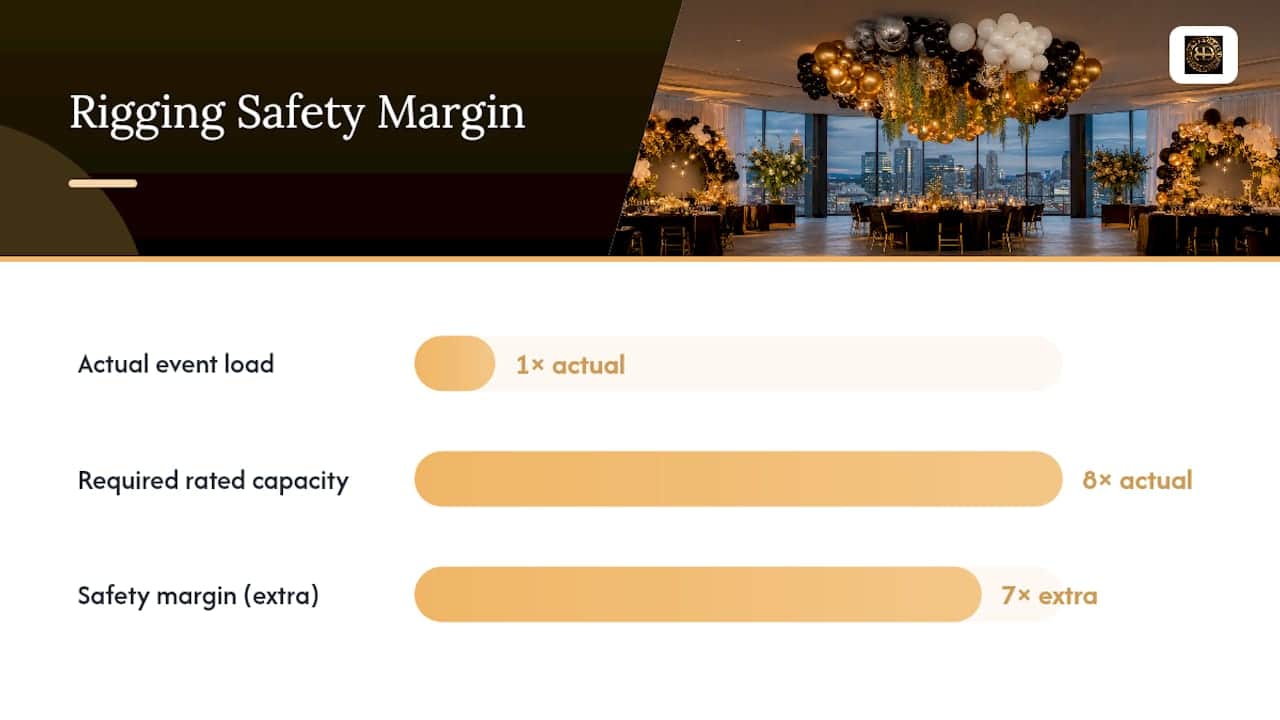
Before you hang a single anchor, request the venue’s certified rigging-point map, since ballrooms publish specific point-load limits that a single overloaded point can exceed even when the total installation weight seems modest.
Key requirements to confirm with any venue:
- A written rigging plot showing anchor points and calculated loads
- Confirmation that no single point exceeds its published working load limit
- An ETCP-certified rigger or structural engineer sign-off for large overhead installs
- NFPA 701 flame-resistance documentation for balloons and any soft goods used in the design
Quick fact: PLASA’s ICOPER guidance stresses that temporary rigging must be preplanned by a competent person with venue-specific drawings, and reviewed by a structural engineer whenever load capacities are approached. Many venues also require NFPA 701 flame-resistance proof before approving any decorative install in a public assembly space, so build that paperwork request into your planning timeline early.
Luxury Design Ideas That Elevate a Balloon Chandelier
A chandelier only reads as luxury when scale, finish, and lighting work together. Ceiling height under 10 feet rarely produces the dramatic hanging effect planners are chasing, and can crowd guests instead of impressing them, so measure clearance before committing to the concept.
Once scale is settled, finish is where the design earns its luxury label:
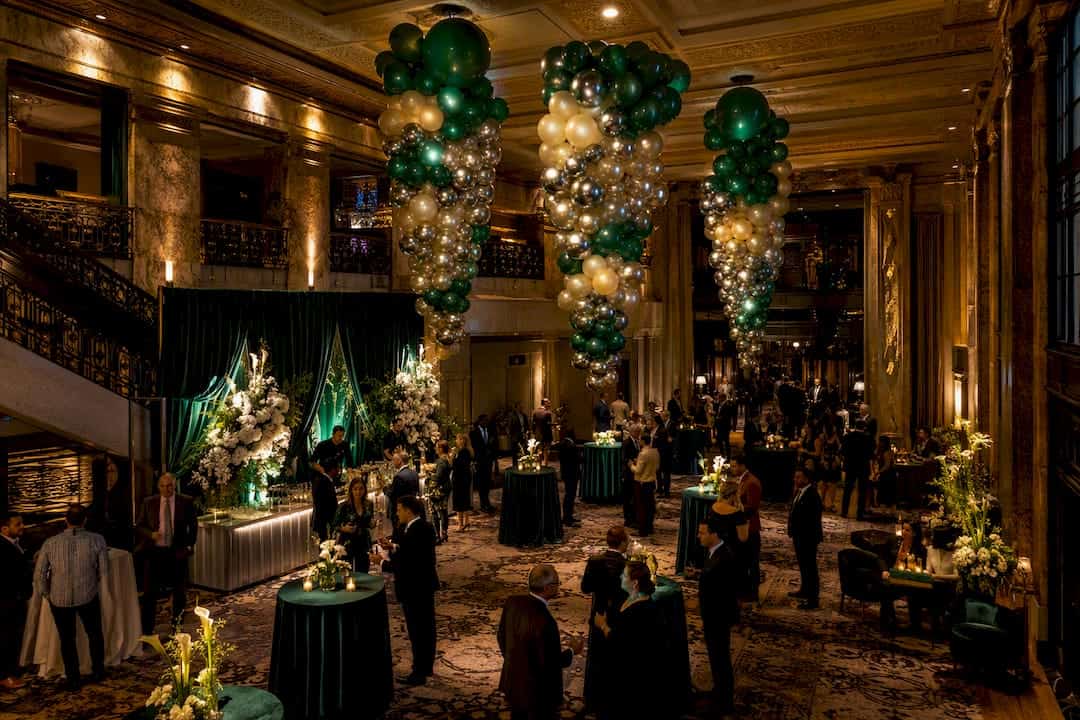
- Jewel tones like emerald, sapphire, and garnet paired with pearlescent whites read as upscale rather than party-store
- Chrome balloon accents catch overhead lighting and add a metallic shimmer that flat matte finishes can’t replicate
- Fresh florals or trailing greenery woven through the base of the cluster soften the geometry and add texture
- Focused LED uplighting or spotlighting from below turns the chandelier into the room’s visual anchor after dark
For composition, concentric rings of graduated size create the classic chandelier silhouette, while staggered drop lengths add asymmetry that photographs beautifully from multiple angles. Branded color palettes can be woven into the design, which is straightforward to execute once the rigging plan is locked. For more palette and texture inspiration, browse luxury balloon décor ideas built specifically for upscale installations.
Pro Tip: Stagger three or four drop lengths within the same cluster instead of one uniform length. That single adjustment is what makes an installation look custom-designed rather than assembled from a kit.
Timing, Staffing, and Pricing Factors to Budget For
Air-filled installations can go up one to two days ahead of the event with minimal appearance risk, which is why most large-scale chandeliers use air rather than helium for anything installed more than a few hours before guests arrive. Helium clusters, by contrast, need same-day or evening-before installation with Hi-Float treatment to survive through the event.
Crew size scales with the installation itself:
- Small accent chandeliers (single focal point, under 8 feet wide): two-person crew, half a day
- Medium tiered installations (ballroom centerpiece scale): three to four person crew, full day including rigging setup
- Large multi-point chandeliers spanning a dance floor: five or more crew members, often split across a rigging day and a styling day
Pricing swings on rigging complexity, venue access fees, labor hours, and rush timelines more than on balloon count alone. Waterfall-style kits with distributed anchors typically run $200 to $500 for the kit component before labor, with premium labor charges added for large or same-day rush installs. The most common schedule risk is discovering a venue’s rigging map or permit requirement too late, so request that paperwork the moment a date is booked. Details on delivery logistics and crew coordination are covered in this event setup guide.
How a Professional Balloon Installer Handles the Details
Atlanta Balloon Designer LLC approaches every chandelier installation the same way a structural rigger would approach any suspended load: plan first, build second. That typically means:
- Custom design consultation matched to ceiling height and venue restrictions
- Direct coordination with venue engineering or operations teams on rigging approval
- Certified installation crews trained on anchor placement and load distribution
- Timeline management that accounts for helium versus air staging windows
Hiring a professional for this specific installation type removes the guesswork around venue-certified rigging points and required documentation, since the crew arrives already knowing what a given ballroom or hotel typically requires. Planners exploring venue logistics further can review the venue coordination guide for a closer look at how approvals move from request to signed-off installation.
Tearing Down a Balloon Chandelier Without Damaging the Venue
Teardown deserves the same planning as installation, because rushed removal is where venue damage claims happen. Start by deflating helium clusters with a pin or manual release rather than yanking hardware loose while balloons are still full. That prevents sudden weight shifts that can pull an adhesive hook off drywall and take paint with it.
Work top to bottom. Remove the lowest drop lines first, then work upward toward the primary anchor points, since this keeps the remaining structure balanced instead of lopsided and straining on one side. For rigged installations, a second crew member should be spotting from the floor the entire time, watching for swinging hardware or falling clips.
Adhesive hooks need patience. Warm them slightly with a hairdryer if the venue allows it, then peel at a low angle rather than pulling straight out, which is what tears paint or plaster. Log any hook that leaves residue so your team can return with proper adhesive remover before the venue’s next walkthrough.
Latex debris is the most overlooked cleanup step. Popped balloon fragments scatter further than expected, especially under HVAC airflow, so plan for a full floor sweep under the installation footprint, not just the immediate landing zone. Bag and remove all deflated latex and mylar the same night. Most venues, especially Atlanta hotel ballrooms and corporate event spaces, include a cleanliness clause in their rental agreement, and leftover balloon fragments are a common source of deposit disputes. Budget teardown time at roughly a third of your original setup time, and never leave rigging hardware behind, even temporarily, since unattended overhead hardware is a liability the venue will flag immediately.
Keeping a Balloon Chandelier Looking Sharp All Night
A chandelier that looks flawless at 6 p.m. can look tired by 10 p.m. without a little mid-event attention. Heat is the biggest threat. Balloons positioned near stage lighting, string lights, or heat lamps shrink and shrivel faster than the rest of the installation, so route hot fixtures away from dense balloon clusters whenever the floor plan allows it.
Assign one team member to do a visual sweep every 90 minutes to two hours during longer events. They’re checking for three things: any balloon that’s visibly deflating faster than its neighbors, any cluster that’s drooped or shifted position, and any clip or hook showing early signs of strain. Catching a slipping cluster before it falls is far easier than repairing the aftermath in front of guests.
Keep a small touch-up kit on standby near the room, out of guest sight. A few pre-inflated matching balloons, extra clips, spare fishing line, and a portable pump let a floor manager swap out a failing balloon in under two minutes without anyone noticing. For helium sections, keep a sealed spare cylinder nearby in case a cluster needs a same-night refresh.
Humidity and temperature swings also matter more than most planners expect. A rooftop event moving from daylight heat into cooler evening air will see balloons contract slightly as temperatures drop, which can loosen previously snug ties. A final tightness check about an hour after sunset catches most of these shifts before they become visible sagging.
Fixing Common Balloon Chandelier Problems on Site
Deflation and attachment failure are the two issues that account for most on-site balloon chandelier complaints, and both have fast fixes if your crew is prepared.
Balloons deflating faster than expected usually traces back to one of three causes: a helium fill without Hi-Float treatment, a sharp edge on nearby rigging hardware nicking the latex, or unexpectedly high ambient heat near the installation. Check for physical contact points first, since a balloon resting against a rough clip or wire edge will slowly lose air even without a visible puncture. If the cause is heat, relocating the cluster a few feet from the light source often solves it without any balloon replacement.
Attachment failures, meaning a clip slips or a hook releases, almost always come down to underestimating cluster weight or skipping the adhesive cure time. If a hook fails mid-event, don’t reattach to the same damaged spot. Move to a fresh, tested location and redistribute the load across two points instead of one if the original point was clearly undersized.
Uneven drooping across a symmetric design usually means one section is helium and started losing lift before its neighbors. Keep a same-fill-type spare on hand rather than mixing in an air-filled substitute mid-repair, since the two will drift out of alignment again within the hour.
The single best troubleshooting habit: photograph the finished installation immediately after setup. That reference image makes it instantly obvious later which section has shifted, sagged, or lost its shape, so your team can respond precisely instead of guessing at what looks “off.”
The Planner’s Real Takeaway on Balloon Chandeliers
Most articles on this topic treat rigging standards and design inspiration as two separate conversations. That split is where planners get into trouble. A stunning color palette means nothing if the anchor point behind it is rated for a fraction of the actual load, and a technically sound rigging plot delivered with mismatched, flat-finish balloons won’t read as luxury no matter how solid the hardware is.
The conventional advice to “just use fishing line and hooks” undersells how much ceiling height, venue rigging documentation, and flame-resistance requirements shape what’s even possible in a given room. A planner who measures clearance and requests the rigging-point map before choosing a design concept will avoid the two most common failure points: an underwhelming low-ceiling install and a last-minute venue rejection over missing paperwork.
Prioritize documentation first, design second. Get the rigging plot and flame-resistance proof sorted before falling in love with a chrome-and-emerald concept that a given ceiling might not support. Everything else, the florals, the LED accents, the staggered drop lengths, is easier to adjust than a denied venue approval three days before an event.
— Kay
Ready to Book Your Luxury Balloon Chandelier
Atlanta Balloon Designer is the turnkey alternative to piecing together rigging hardware, venue approvals, and balloon sourcing on your own. Instead of chasing down a rigging-point map, testing adhesive cure times, and hoping your fishing line holds through a five-hour reception, our certified crews handle the engineering, the paperwork, and the styling as one coordinated service.

We serve Atlanta and surrounding communities within a 60-mile radius, including Marietta, Sandy Springs, Decatur, and Alpharetta, with the same certified rigging standards and luxury finish quality whether your event is a downtown ballroom gala or a rooftop brand activation. If a live band or DJ is part of your evening, coordinating installation timing around sound checks matters too, and partners like wedding and event musicians can help align that schedule with your décor team.
Ready to see what’s possible for your ceiling height and venue? Request a venue coordination consultation and get a rigging-informed estimate before you commit to a design concept.
Rigging and Safety Resources Venues May Request
Venues frequently ask for proof of compliance before approving an overhead installation. Keep these references on hand:
- ESTA’s published rigging standards, including ANSI E1.4-1 design-factor guidance
- PLASA’s ICOPER documentation for temporary rigging preplanning requirements
- NFPA 701 flame-resistance guidance for decorative materials in public assembly spaces
Sources
- ESTA / published documents (rigging standards)
- PLASA ICOPER v1.0 (rigging and site documentation)
- DCE Productions — Ballroom rigging explained
FAQ
How Do You Attach Balloons to a Chandelier Frame?
Use rated hardware matched to the frame material: bridling and carabiners for exposed beams or trusses, and grid clips for drop-tile ceilings. Never rely on adhesive alone for anything beyond a light accent cluster.
How Do I Install Balloons on My Ceiling Safely?
Confirm the ceiling type first, test any adhesive hook on a hidden patch, and let it cure fully before hanging weight. For anything over a small accent piece, request the venue’s rigging-point map before you attach a single anchor.
What’s the Best Way to Hang a Balloon Garland on a Wall?
Use removable adhesive hooks rated for the garland’s weight, spaced evenly along the intended line, and always test the adhesive on an inconspicuous section of wall first since paint types cure differently.
Can You Set Up a Balloon Garland the Day Before an Event?
Yes, if it’s air-filled. Air-filled installations hold their shape for days, making a one to two day setup window standard practice, while helium-filled sections should go up the same day or evening before with Hi-Float treatment.
Should I DIY a Balloon Chandelier or Hire a Professional?
Small accent installations under about 10 feet in low-risk rooms are reasonable DIY projects. Anything larger, higher, or rigged over a crowd should go to a certified installer like Atlanta Balloon Designer, who can secure venue rigging approval and manage load distribution properly.